| This article presents a hack for sharing JSPs across multiple web projects within WSAD. It uses the external build tool mechanism to invoke an Ant script that perform workspace copy operations necessary to refresh referencing projects. |
I've seen the soft-link capability of Rational ClearCase used to accomplish this when ClearCase was the underlying source control tool. For each project wishing to reference the content of the shared project, soft-links are created to reference the shared JSPs. This solution is flexible with respect to the selection of the shared files. To override the shared copy, simply replace the soft-link with an actual file.
A labor intensive alternative would be to simply copy the JSPs from the shared project to referencing projects that use these JSPs. Whenever content of the shared project changes, it would have to be copied to every referencing project. This is more aggravation than even the avid re-use fanatic is willing to endure. But with the external build tool mechanism of the Eclipse platform and a simple Ant script, much of this manual labor can be automated.
Because the Ant copy task is so flexible, any portion of
a project may be shared. But the aim of this article is to start
things simply. We'll assume we have a project holding JSPs, static
content, JavaScript and configuration files that are to be shared
among several projects. However, we will assume that each referencing
project has its own WEB-INF and META-INF directories.
This copy scheme could have also accomodated the deployment descriptors
and Java code residing in these two directories. But the focus of this
article is JSPs and static files.
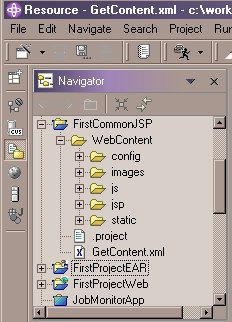
In our example, the shared project is named FirstCommonJSP. Its organization is illustrated by the Eclipse Navigator view screen-shot on the right. There are a few things to note.
By keeping the Ant script in the project that contains the files to be copied, the manner of the sharing of files can be managed together with the files to be shared.
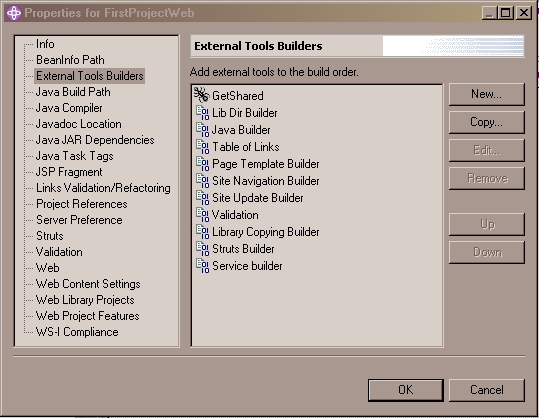
The builders are listed in the order that their associated actions are carried out at build time. As the New button implies, additional builders can be configured to run at build time. You can either specify an executable program with arguments or specify the target of an Ant script. These additional build configurations are known as external tools builders. The figure above shows the builders for a web project. In this screen shot, only the first builder is user-defined (shown with an Ant icon). All the others are defined by plugins.
For our present purpose, we will configure an external build tool to reference an Ant script that performs a copy operation. Using special build tool variables, we can specify the source and target of the copy operations. We will also be able to specify for which builds we want the Ant script to run.
1 <project name="GetContent" default="CopyContent" basedir=".">
2    <target name="CopyContent">
3       <echo> Running CopyContent </echo>
4       <echo> target = ${targetProject}/WebContent </echo>
5       <copy todir="${targetProject}/WebContent" overwrite="true" >
6          <fileset dir="WebContent" excludes="**/CVS/*"/>
7       </copy>
8    </target>
9 </project>
|
Its only task is to copy some files from one directory to another. Hence the default target in line 1 is the only target, namely the CopyContent target whose definition begins on line 2. Lines 3 and 4 are simply print statements. The actual copy task begins on line 5, the most important line of this simple script. Note that the todir parameter is set to the targetProject variable that was set in the external tool builder configuration described below. This is how the script knows the destination of the copy.
Also in line 5, the overwrite attribute of the copy command has been set to true. This is contrary to the default, which will only copy a file in the fileset if the source file is newer than the destination file. This is to ensure that the destination files are always the same as the source files after the copy operation. But in our case, the two timestamps may not be related. So a brute force copy operation is done regardless of timestamp.
Line 6 provides an example of excluding certain items in the copy operation. In this case, we exclude the CVS metadata since we certainly don't want that getting mixed-up between projects.
Line 1 also contains a basedir attribute. By setting it to "." we are setting the base directory to the directory in which the Ant script resides. This has an implication for the dir attribute in line 6. The value of "WebContent" means the WebContent directory relative to the base directory specified in line 1. This does not apply to absolute directory values, such as the todir attribute in line 5.
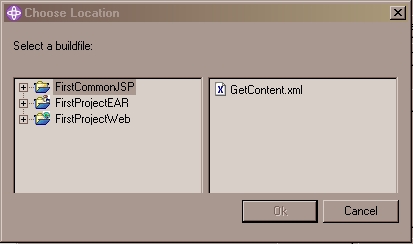 For the location field, click the Browse Workspace ...
button and select the shared project in the left-hand panel. The
Ant script should appear on the right-hand side as shown in the
figure on the right. Select it and click OK.
The name should appear in the Location field.
For the location field, click the Browse Workspace ...
button and select the shared project in the left-hand panel. The
Ant script should appear on the right-hand side as shown in the
figure on the right. Select it and click OK.
The name should appear in the Location field.
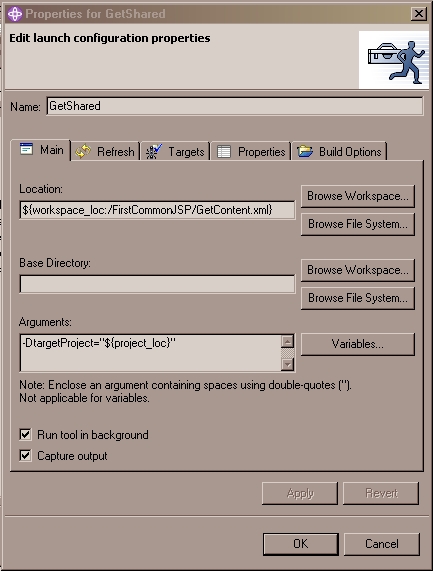
-DtargetProject="${project_loc}"
The ${project_loc} is a special variable populated by the
Eclipse external tool mechanism. At runtime, its value will be
the absolute path name of the project that was selected when the
Ant script was invoked. In our case, this will be the project that
is the target of the copy. To view a list of such available variables,
click the Variables... button.
Be sure to place the project location in double quotes. Otherwise, if it expands to something with spaces in it, the Java command line interpreter (that runs Ant) will get confused.
The Capture output is not really necessary. It causes output to be sent to the console view. It's nice to have for the first few builds as an indication things are going well. If it bothers you, uncheck it.
 Click the Refresh tab.
The point of this panel is to run
refresh on any resources that may have been changed by the external
tool. Remember that Eclipse maintains some of the workspace state
in memory. If a process outside of Eclipse makes changes to the
underlying file system holding the workspace, Eclipse won't
necessarily learn about it. So in order to have the changes reflected
in the Eclipse runtime, a refresh must be invoked.
Click the Refresh tab.
The point of this panel is to run
refresh on any resources that may have been changed by the external
tool. Remember that Eclipse maintains some of the workspace state
in memory. If a process outside of Eclipse makes changes to the
underlying file system holding the workspace, Eclipse won't
necessarily learn about it. So in order to have the changes reflected
in the Eclipse runtime, a refresh must be invoked.
Our external build tool is just such an external process. If we ran it independently from the command line, we'd have to manually select the affected folders in Eclipse and invoke the refresh. This refresh panel allows us to specify an automatic refresh. The various options allow us to limit the scope of the refresh. Too large a scope takes too much time. Too small a scope doen't refresh everything that was changed.
Check both boxes
Chose ${project} as the scope. Our script doesn't
change anything outside the project.
Note: If you see a red X on the Target tab, see the Troubleshooting Guide below.
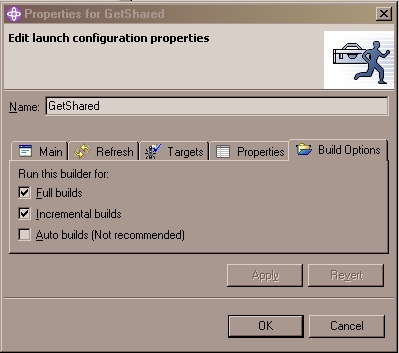 Click the Build Options tab. Ensure
are chosen. Do not choose "Auto builds". This will cause the build to run each time a change to the project is saved. This is usually too often. It can cause the build to run when you don't intend or want it to.
To invoke the configuration builder with these settings, select the project to build in the navigation panel and choose Project --> Rebuild Project as shown below.

1 <copy todir="${targetProject}/WebContent" overwrite="true" >
2    <fileset dir="WebContent">
3       <exclude name="**/CVS/*"/>
4       <exclude name="**/WEB-INF/**"/>
5       <exclude name="**/META-INF/**"/>
6    </fileset>
7 </copy>
|
In the example above, we added excludes for the WEB-INF and META-INF directories. This could be useful if you made your shared project a Web project.
It's instructive to compare this example with the original file. Line 6 of the original file shows an excludes attribute of the fileset tag. This is a convenience mechanism which is handy when you only have a few to list. A comma is used as a separator for multiple excludes. An alternative is to list each exclude on a separate line. For this, the excludes attribute of the fileset tag gives way to a separate exclude tag (note the tag name is singular, the attribute name is plural). This can make a list of excludes easier to read.
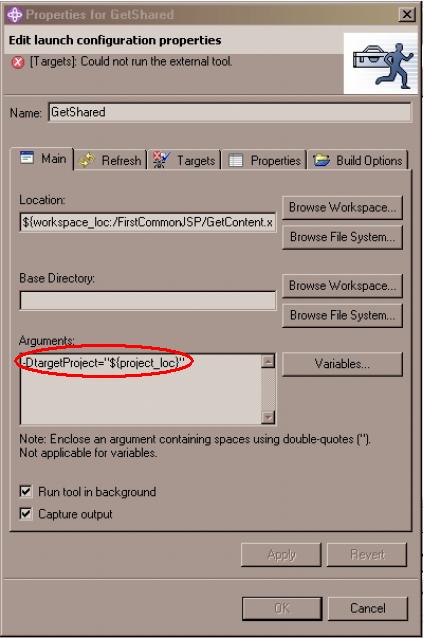 There is a bug in the External Tools Builders editor for the Eclipse
2.x base (fixed in Eclipse 3.0). If you add an item to the
Arguments field in the Main tab like we did in step
6 of the configuration, subsequent attempts to modify this configuration
after it is saved will result in the error shown on the right. Because
the dialog senses an error, the OK button will not be enabled and
you will not be able to save any changes.
There is a bug in the External Tools Builders editor for the Eclipse
2.x base (fixed in Eclipse 3.0). If you add an item to the
Arguments field in the Main tab like we did in step
6 of the configuration, subsequent attempts to modify this configuration
after it is saved will result in the error shown on the right. Because
the dialog senses an error, the OK button will not be enabled and
you will not be able to save any changes.
The following steps provide a work around.
From this stage, you should be able to perform any edits you wish.